« 4.4: Animated Trigonometry |
5.2: Data Visualisation »
This tutorial introduces Python lists and dictionaries. These datatypes will unlock powerful ways to manage and manipulate collections of elements as opposed to individual values. Following a review of the basics, you’ll look at employing these techniques to visualise data, and reading in values from external files.
Lists
Unlike the datatypes you’ve encountered thus far, lists hold multiple values. To illustrate, consider these two variables:
student = 'Sam'
age = 24
Here, 'Sam' represents a student name – or more technically speaking, some string data. Recording Sam’s age requires an additional age variable. However, one can assign both values to a single variable using a list-type approach:
student = ['Sam', 24]The square brackets contain both the string and integer values. You may never have used a list before, but can likely make some sense of the syntax? More on syntax shortly, though. You may also be wondering: wouldn’t it be simpler to stick with the two separate variables? Perhaps. It really depends on the application. Lists are ordered, and ordering is significant in many situations – for example, in this sequence of rainbow colours:
rainbow = [
  'red',
  'orange',
  'yellow',
  'green',
  'blue',
  'indigo',
  'violet'
]
Moreover, lists (and dictionaries) are particularly powerful when combined with loop statements. Performing repetitive operations on diverse data sets is a common programming challenge. As an example: you are tasked with generating a population pyramid for each of the world’s (195, or so) countries. Provided that you can write some loop that plots the chart using a list of Chinese population figures, the list values can be switched out for Transnistria.
Working with Lists
To familiarise yourself with defining, accessing, and modifying lists, create a new sketch. Save this as “rainbow_list” and add the following code:
rainbow = ['blue', 'orange', 'yellow']
print(rainbow)
The rainbow is currently missing a few colours, and the sequence is incorrect, but this will be amended as we progress. Run the code and observe the Console output:
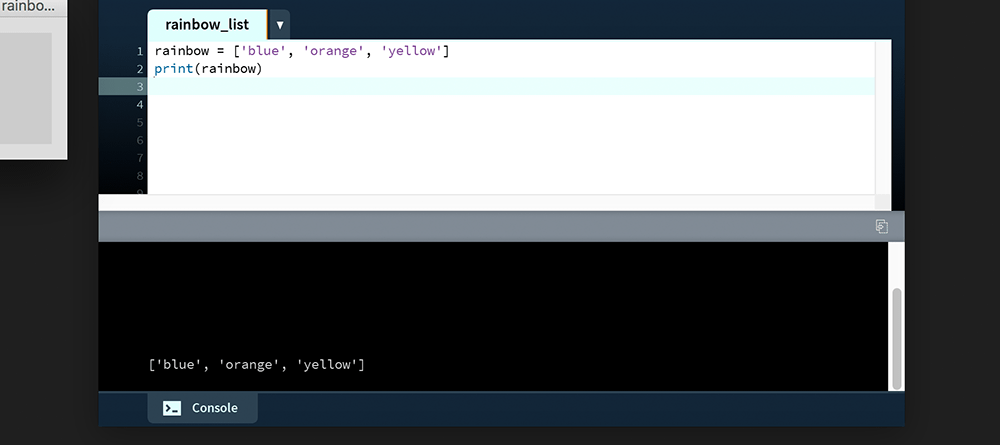
Printing the rainbow variable displays all three values (along with square brackets and commas). In many instances, though, it’s an individual element that you wish to retrieve. To display a given value, specify its position (index) in square brackets. Begin by printing the first element. Note, however, that Python list indices begin at zero:
...
print(rainbow[0])
Run the sketch to confirm that the Console displays blue.

One can think of each element’s position as its offset from the start of the list. The second element, orange, has an index of 1. The last element in this list, yellow, has an index of 2.
...
print(rainbow[1])   # displays orange
print(rainbow[2])   # displays yellow
Maybe this syntax remind you of slice notation? Well, it works the same way! For example, the last element can be accessed using -1, while a subset of elements can be extracted using a colon. Add the following code:
...
print(rainbow[-1])  # displays yellow
print(rainbow[-2])  # displays orange
print(rainbow[0:2]) # displays ['blue', 'orange']
Should you specify an index beyond the bounds of the list – say, rainbow[3] or greater – the Console will display an IndexError message.
Modifying lists
Many lists are dynamic in nature. Consider a game like Breakout (image below). A list stores the bricks comprising the wall; hitting a brick removes it from this list. In some levels, additional bricks may appear during play, thereby inserting new list elements.
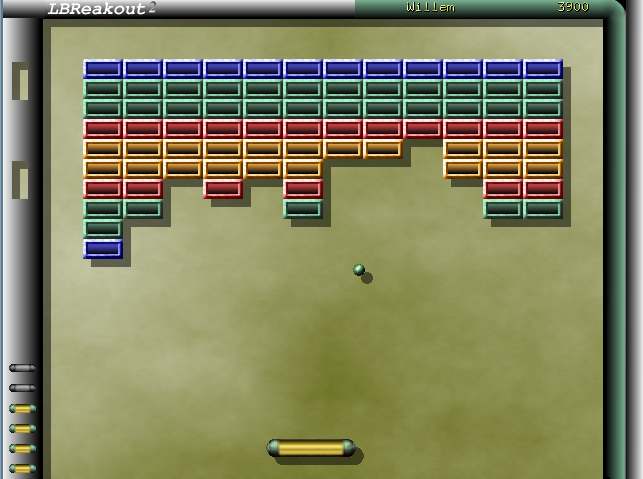
Wilinckx [GPL], from Wikimedia Commons
I am assuming you’ve played some variant of this game and are probably aware that, upon destruction, select bricks drop power-ups. Moreover, bricks come in different colours, some may be invisible, and others take multiple hits to destroy. These additional properties can all be programmed using lists of lists. Yes – lists can contain other lists, which can, in turn, can contain further nested lists … but more on that later.
To modify an existing element, reassign a new value like you’d any other variable but include the index in square brackets. Take a practical example: red must replace blue as the first value in the rainbow list. To accomplish this, add the following lines to the bottom of your “rainbow_list” sketch:
rainbow[0] = 'red'
print(rainbow)      # ['red', 'orange', 'yellow']
The Processing reference includes a number of List Methods. Correctly speaking, these are standard (as opposed to Processing.py) Python features, functional in any Python environment. What follows below are descriptions for several such methods along with code to add to your working sketch. Each example builds on the code before it, so you’ll need to work through all of them, entering each line as you progress.
.append()
Adds an element to the end of a list.
rainbow.append('blue')
print(rainbow)      # red, orange, yellow, blue
.extend()
Adds one list to the end of another list.
colors = ['indigo', 'violet']
rainbow.extend(colors)
print(rainbow)
# red, orange, yellow, blue, indigo, violet
.index()
Returns the index (position as an integer) for the argument provided; if there are multiple matches, this represents the lowest/first instance. If there’s no matching value, the Console reports a ValueError message.
yellowindex = rainbow.index('yellow')
print(yellowindex)  # 2
.insert()
The insert method accepts two arguments: the first is the index/position to insert the element; the second is the value.
rainbow.insert(3, 'green')
print(rainbow)
# red, orange, yellow, green, blue, indigo, violet
.pop()
The pop method accepts a single argument: the index/position of an element to remove. The pop-ed value is returned, should you need to utilise it for some other operation.
i = rainbow.pop(5)  # removes indigo and assigns it to i
'''
or, to just remove indigo:
rainbow.pop(5)
'''
print(i)            # indigo
print(rainbow)
# red, orange, yellow, green, blue, violet
However, the argument is optional. If you provide none, Python removes the last element.
rainbow.pop()       # removes violet
print(rainbow)
# red, orange, yellow, green, blue
.remove()
Removes the first element with a value that matches the argument.
rainbow.extend(colors)
print(rainbow)
# red, orange, yellow, green, blue, indigo, violet
rainbow.remove('indigo')
print(rainbow)
# red, orange, yellow, green, blue, violet
Python does offer other list methods, but the above should suffice, for now at least. Any decent Python reference should cover the others – failing that, there’s always your favourite search engine. If you are looking to reorder list elements, there are the reverse() and alphanumerical sort() methods.
Rainbow Sequence Task
Time to consolidate what has been covered thus far. In this challenge, you’ll apply various list techniques to shuffle the colour bands of an incorrectly sequenced rainbow (orange, followed by violet, then blue, red, yellow, green, and indigo). Wait – what the heck is indigo, anyway? According to the dictionary, indigo is a “purplish-blue colour”, and violet is a “blueish-purple colour” 😕. On that point, why is there no purple band in the rainbow?
Purple is a combination of two spectral colours. There’s no wavelength of purple light – it only exists as a combination of red and blue waves. Violet, however, is an actual spectral colour with its own wavelength of approximately 380–420 nanometres. Indigo is positioned somewhere between blue and violet, but exactly where – or if at all – is a matter for debate. In his famous prism experiments, Isaac Newtown defined seven rainbow colours, squeezing indigo in just before violet. You may wonder, why seven colours from a blended array spanning the visible spectrum? It’s because seven had occult significance. It’s no coincidence that there are seven colours in the rainbow, seven days of the week, and seven musical notes that make up the Western major scale. Today, though, colour scientists are inclined to divide the spectrum at violet and blue, leaving no room for indigo.
In these lessons, we’ll drop indigo in favour of a six colour rainbow (just like Pink Floyd did).
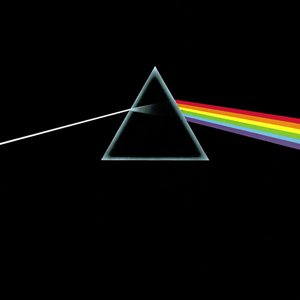
Capitol Records [Copyright], from pinkfloyd.com, via Wikipedia
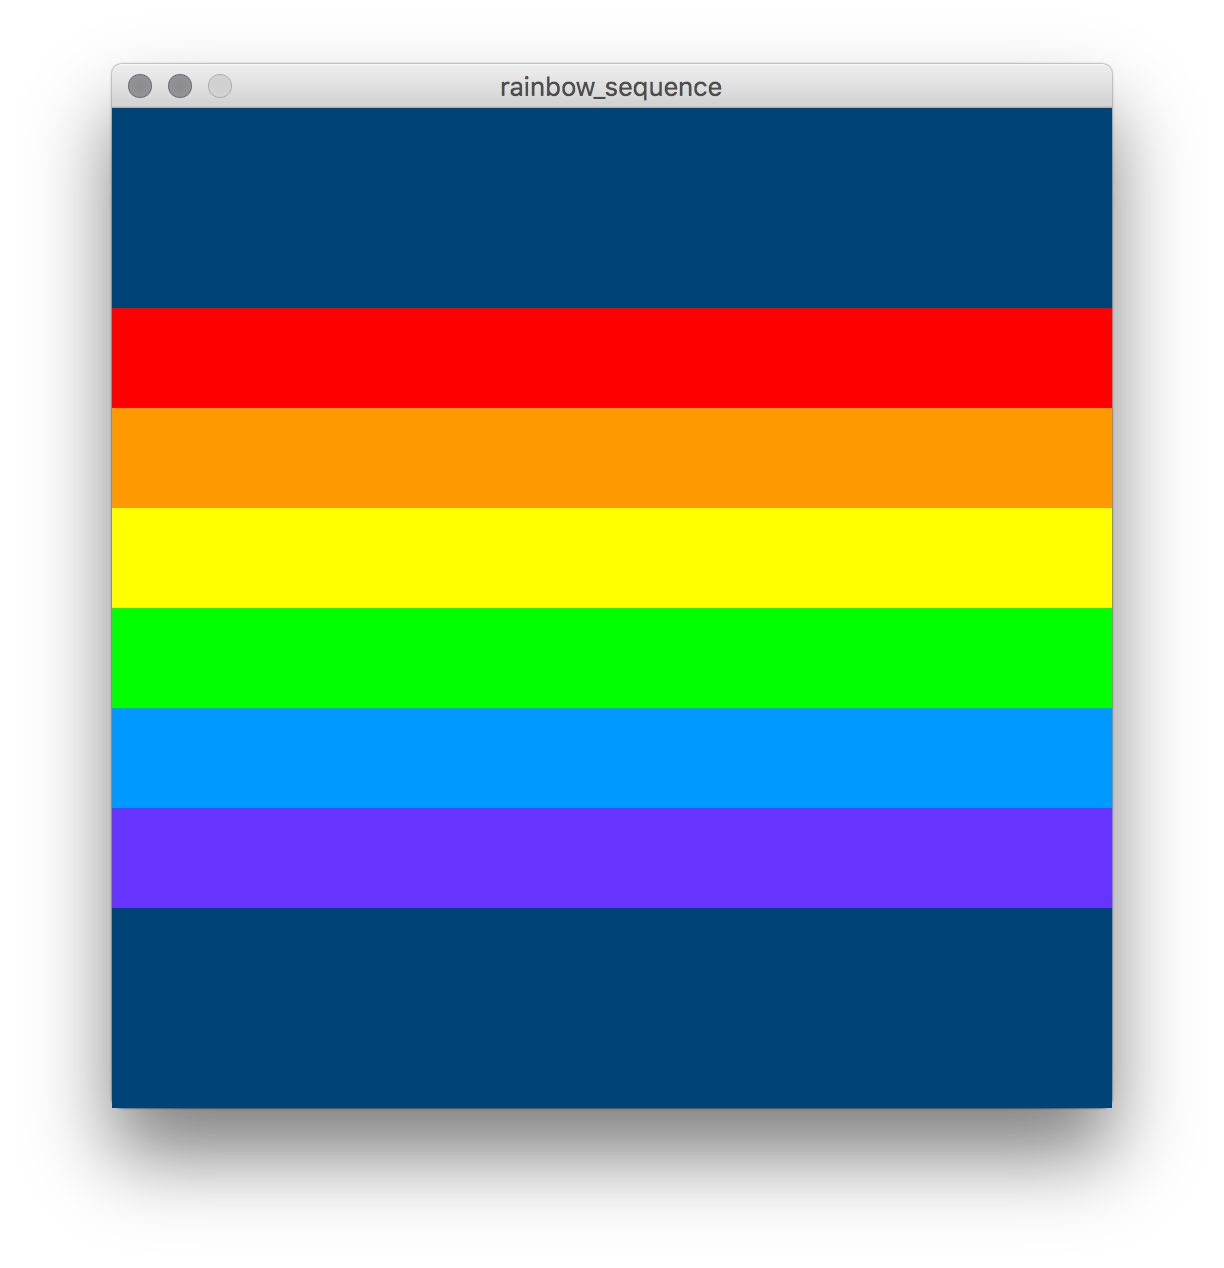
Create a new sketch and save it as “rainbow_sequence”. Copy-paste in the following code:
size(500,500)
noStroke()
background('#004477')

bands = [
  '#FF9900', # orange
  '#6633FF', # violet
  '#0099FF', # blue
  '#FF0000', # red
  '#FFFF00', # yellow
  '#00FF00', # green
]

fill(bands[0]); rect(0,100, width,50)
fill(bands[1]); rect(0,150, width,50)
fill(bands[2]); rect(0,200, width,50)
fill(bands[3]); rect(0,250, width,50)
fill(bands[4]); rect(0,300, width,50)
fill(bands[5]); rect(0,350, width,50)
Now, insert the following code just above fill/rect lines:
'''# move violet
violet = bands[_]
bands.append(violet)
bands.remove(violet)'''

'''# move blue
blueindex = bands.index('_______')
bands.insert(4, bands.pop(blueindex))'''

'''# switch orange and red
bands.insert(bands.index('_______'), bands.___(_))'''

fill(bands[0]); rect(0,100, width,50)
...
Remove the multi-line commented blocks (''') a section time. The goal is to figure out what values and methods replace the underscores. The correct result looks like this:

Once complete, be sure to save this file. You’ll be editing it further in the next challenge.
Loops + Lists
Loops can be programmed to work with lists, potentially saving on countless lines of manual instruction. As a case a point, let us return to the Breakout game example. Rendering each brick requires at least as many lines of code as there are elements. For example:
fill(bricks[0]);  rect(0,  0, 30,10) # brick A1
fill(bricks[1]);  rect(30, 0, 30,10) # brick A2
fill(bricks[2]);  rect(60, 0, 30,10) # brick A3
...
fill(bricks[59]); rect(270,50,30,10) # brick F10
This is hardly efficient, nor can it handle a list that’s continually adapting in length. In a previous lesson covering for loops, you looked at iterating integer values using a range() function. To perform something similar on a list, you’ll first need to determine its current length.
Create a new sketch and save it as “iterating_lists”. Add the following code:
rainbow = ['red', 'orange', 'yellow', 'green', 'blue', 'violet']
print( len(rainbow) )
The len() function accepts a list as an argument and returns its length. Run the sketch to confirm this.
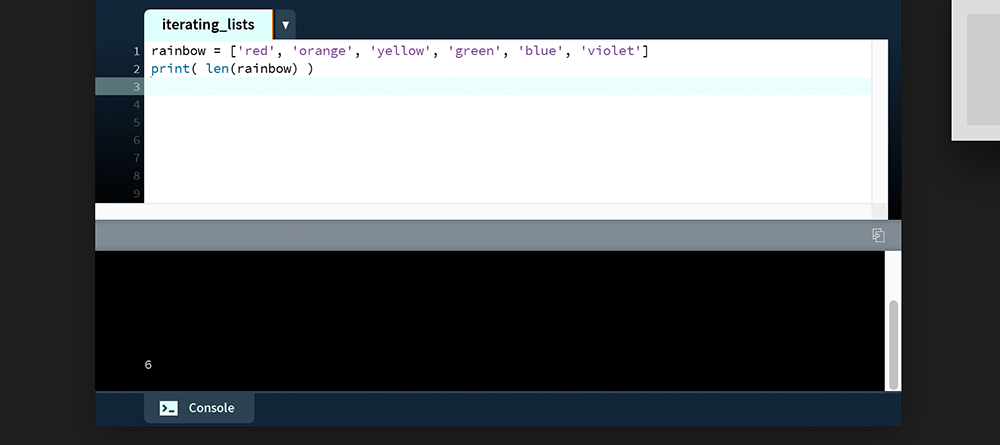
len() function returns a list length of 6.
As the len() function returns an integer – in this case, six – it can serve as an argument for a range() function. Add this for loop to the bottom of your code:
...

for i in range( len(rainbow) ):
    print(rainbow[i])
Run the sketch. With each iteration of the loop, i is incremented by 1. On the first iteration, the print line displays the value of rainbow[0], followed by rainbow[1] on the second iteration, and so on until reaching rainbow[5].
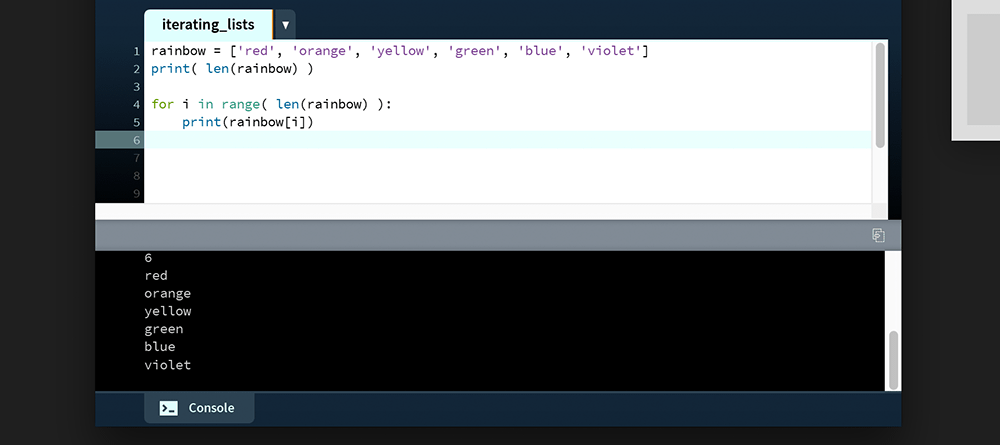
Thus far, your loops have relied on the range() function. It’s employed again here to make the code more relatable. However, Python regards loops as inherently iterable, meaning that one can omit the range function altogether. Comment out the previous loop and replace it with a range-less alternative:
'''
for i in range( len(rainbow) ):
    print(rainbow[i])
'''
for band in rainbow:
    print(band)
Run the code. The Console prints the same list of values. But, what if you wished to display this output instead?
0: red
1: orange
2: yellow
3: green
4: blue
5: violet
Without the i variable from the first version of the loop, you’ve just the element value but no count. One approach is to adapt the earlier loop. For example:
for i in range( len(rainbow) ):
    print( ('%s: %s') % (i, rainbow[i]) )
This way, the i value is used to print the index and retrieve values from the list. However, Python offers another approach using an enumerate() function. This is best explained using a practical example. Add the following to the bottom of your working code:
for i,v in enumerate(rainbow):
    print( ('%s: %s') % (i, v) )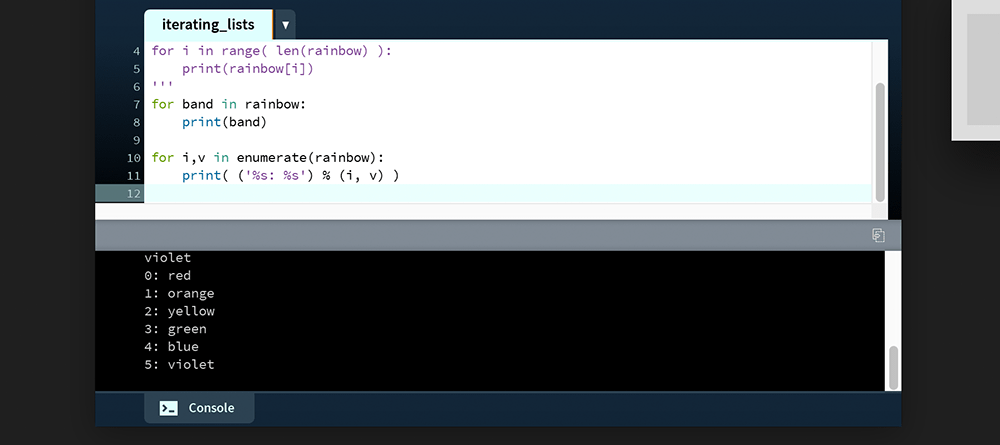
Recall, though, that i and v are variable names. Use whatever you feel is most descriptive – for example:
for number,colour in enumerate(rainbow):
    print( ('%s: %s') % (number, colour) )
In this instance, I have opted for the British spelling of colour to avoid confusing the variable with Processing’s color() function.
No single approach (range, enumerate, etc.) is necessarily better than another. What you elect to use will depend on your coding style and what you need to accomplish.
Rainbow Sequence Loop Task
Reopen your “rainbow_sequence” task from earlier. Your challenge is to convert the following code into something that uses a loop instead:
...

fill(bands[0]); rect(0,100, width,50)
fill(bands[1]); rect(0,150, width,50)
fill(bands[2]); rect(0,200, width,50)
fill(bands[3]); rect(0,250, width,50)
fill(bands[4]); rect(0,300, width,50)
fill(bands[5]); rect(0,350, width,50)
Ensure that the visual result remains the same:
An enumerate() is, perhaps, the more elegant solution. If you ever find yourself weighing-up different approaches, take a quick read through The Zen of Python – a list of 19 one-line principles to help guide your coding.
After grasping the fundamentals of Python lists, the next step is to tackle lists of lists.
5.2: Data Visualisation »
Complete list of Processing.py lessons