« part 1 of 3 |
part 3 of 3 »
In this instalment, you’ll learn about some useful Blender features for writing scripts. You’ll use the Info editor to glean what Python commands are associated with the different actions you perform using the graphic interface. I’ll also introduce the Blender Console, a handy editor for entering line-by-line Python commands that apply immediately to your scene. You’ll use the Console to execute operations that you might otherwise perform with mouse clicks and keyboard shortcuts.
Before proceeding, open Blender (using the command line). If you have it open already, create a new Blender file using File > New > General. You’re looking at a new scene with a cube located at an x-y-z coordinate of (0, 0, 0).
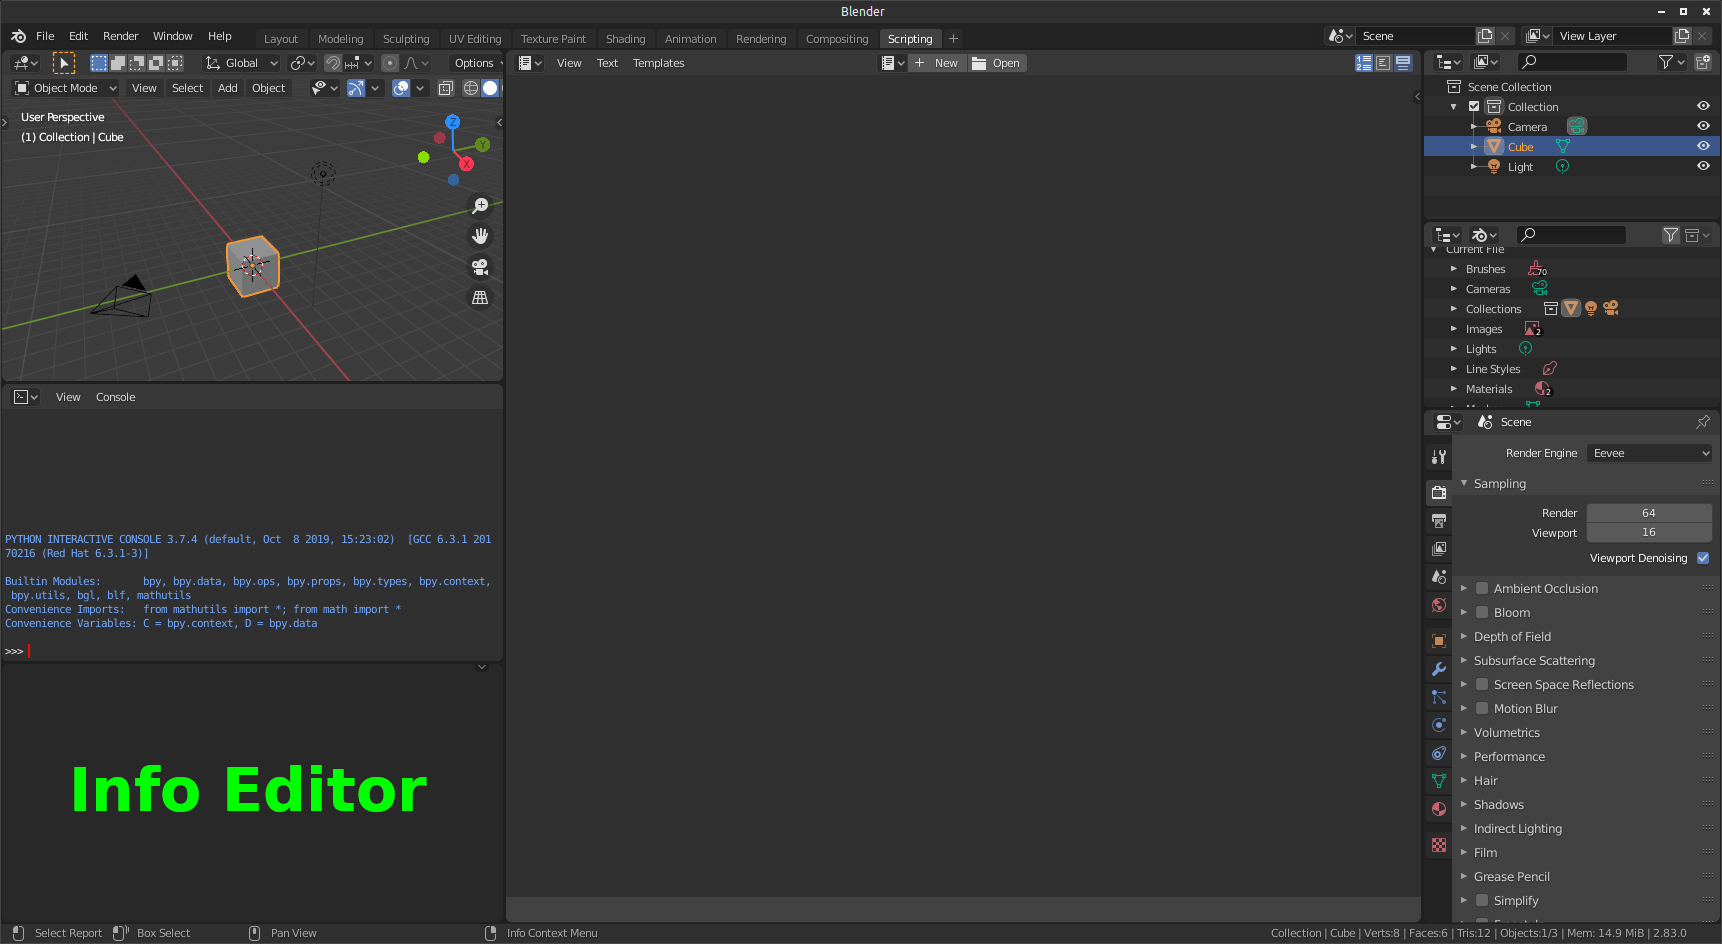
The Info Editor
The Info editor will log any warnings or error messages. It also logs the Python code for the operations you perform in Blender. In the Scripting workspace, you can locate the Info editor at the bottom-left of the Blender window (Figure 2.1).
Select the cube in the 3D Viewport (so it’s outlined orange), and press the G key on your keyboard. You can now move the cube to a new position. When you place the cube (using your left-mouse click), the Info editor will display something like the code highlighted in Figure 2.2:
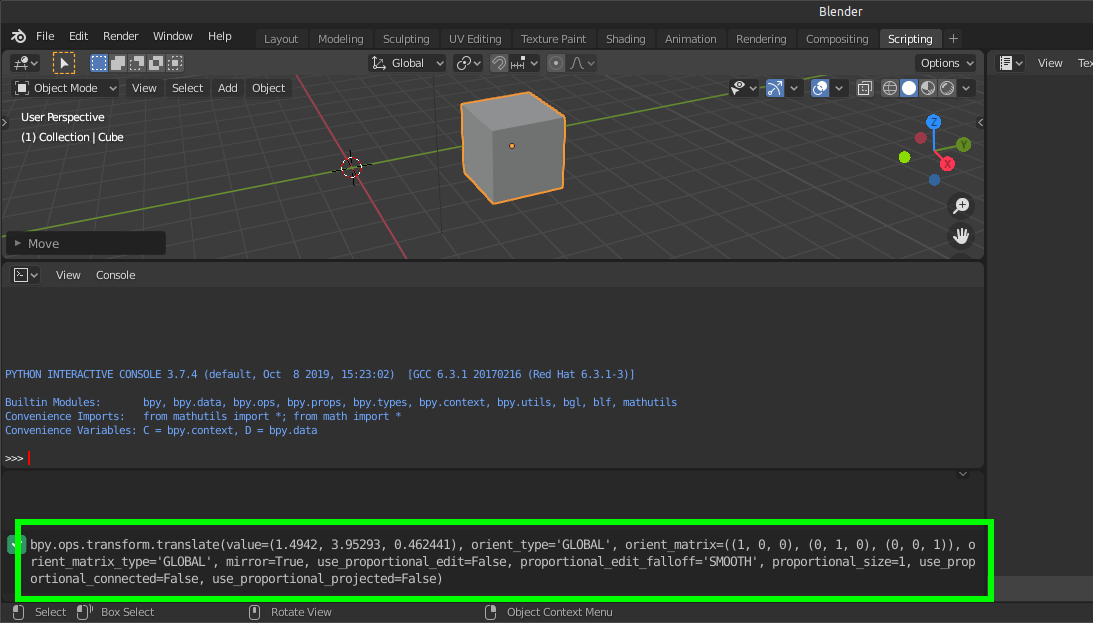
What you see in the Info editor is the Python code to perform that last move operation. Next, you’ll use it to repeat the operation with the Python Console. For now, it’s not important to know how this code works.
The Python Console
The Python Console is located in the area just above the Info editor. You can use it to enter commands to execute them immediately—in other words, without having to write some code in the Text editor then run it. This is useful to run commands in a line-by-line fashion, handy for testing bits of code you might add to a larger script.
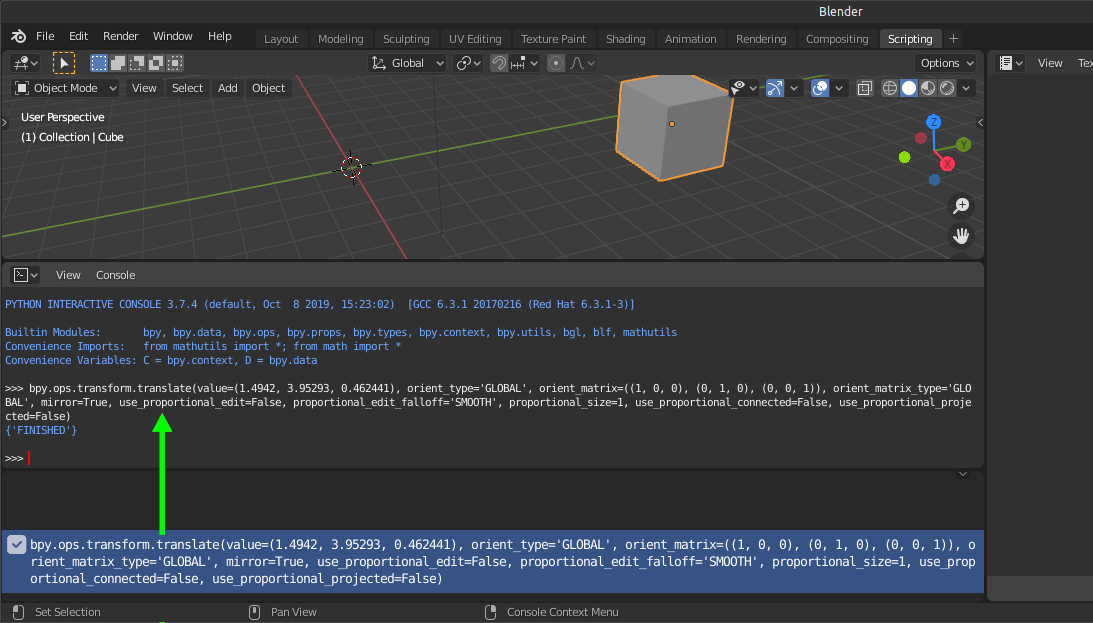
You’ll use the Python Console to run the move code a second time. Right-click on the code in your Info editor and select copy. Alternatively, you can copy my code:
bpy.ops.transform.translate(value=(1.4942, 3.95293, 0.462441), orient_type='GLOBAL', orient_matrix=((1, 0, 0), (0, 1, 0), (0, 0, 1)), orient_matrix_type='GLOBAL', mirror=True, use_proportional_edit=False, proportional_edit_falloff='SMOOTH', proportional_size=1, use_proportional_connected=False, use_proportional_projected=False)
Note that this is one long, wrapped line (not multiple lines). Paste it into the Python Console and hit enter (Figure 2.3). This will rerun the move operation; Blender moves the cube another ‘increment’, the same distance in the same direction you moved it the first time.
Most of the time, you’ll type code into the Python Console (rather than paste it in). If the font is too small for you, you can change the size by holding the ctrl key and scrolling the mouse wheel. Alternatively, you can click View then Zoom In or Zoom Out.
NOTE: You can press the up-arrow key to repeat anything you typed in the Console. Keep pressing up to cycle through every line you’ve entered.
The Python Console includes an auto-completion feature that assists you with typing in commands. Type bpy followed by a dot, then hit the tab key for the auto-completion to list options. Now everything that begins with bpy. is listed in the console (Figure 2.4).
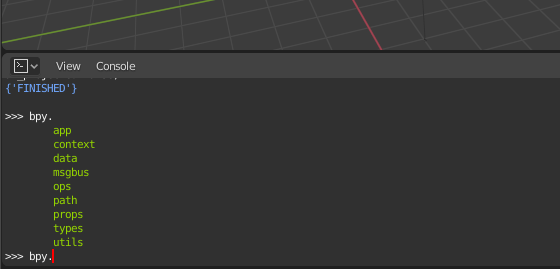
tab key to auto completeType d, then hit tab again; you get bpy.data.
The bpy.data module provides access to all of the data in your working file. That includes any objects, textures, and scenes. To list the objects in your scene, use bpy.data.objects. When you hit enter, you should see:
<bpy_collection[3], BlendDataObjects>
The bpy_collection[3] part indicates there are three objects—the Camera, Cube, and Light. I’ll get into more detail about bpy.data shortly; it’s something you’ll use a lot—so often that Blender provides a convenience variable, D, to save you having to write out bpy.data in full each time. As an example, D.objects is the same as writing bpy.data.objects.
There’s another convenience variable that you should know about, C. This is equivalent to writing bpy.context. You can use it to access an active/selected object via C.object. Ensure that the cube is selected in the 3D Viewport, then type:
C.object.location = (0, 0, 0)
Hit enter; this will reposition the cube in the centre of the scene.
Python Tooltips
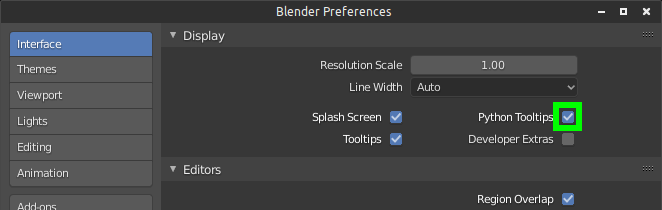
If you’d like to know what Python methods are associated with the different buttons in the Blender GUI, you can enable Python Tooltips. From the top-bar of the application, select Edit > Preferences > Interface; you should see a checkbox labelled Python Tooltips (Figure 2.5).
Once you’ve enabled the Python tooltips, they’ll appear when you hover over a button (Figure 2.6). For example, the Move option (under the Object menu) displays a tooltip that reads bpy.ops.transform.translate().
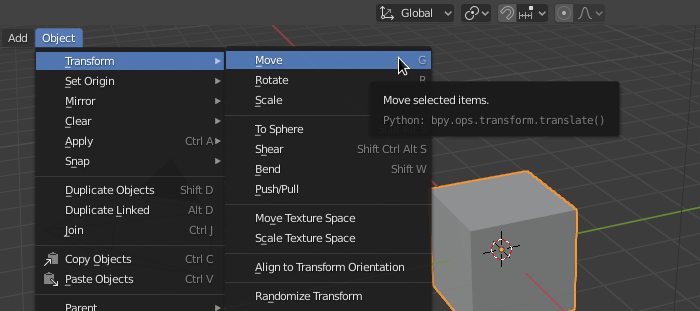
You know from the earlier example that this a method you use for moving objects.
Developer Extras
There’s another useful feature you can enable in the Blender preferences, the Developer Extras. This activates several developer features, but I’ll highlight two here—the online reference links and the option to copy Python commands which will both appear in the GUI context menus.
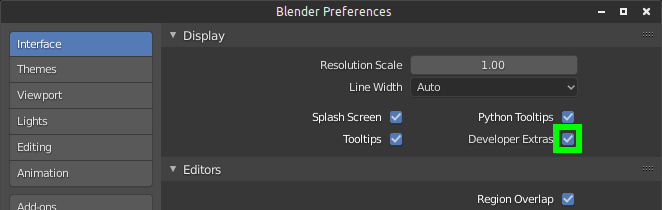
From the top-bar of the application, select Edit > Preferences > Interface; check the Developer Extras option (Figure 2.7).
Now, when you right-click on elements in the Blender GUI, many will present an online reference link. In Figure 2.8, I’ve right-clicked on the Move option in the Object > Transform menu; this links to the bpy.ops.transform.translate() entry on the API documentation website.
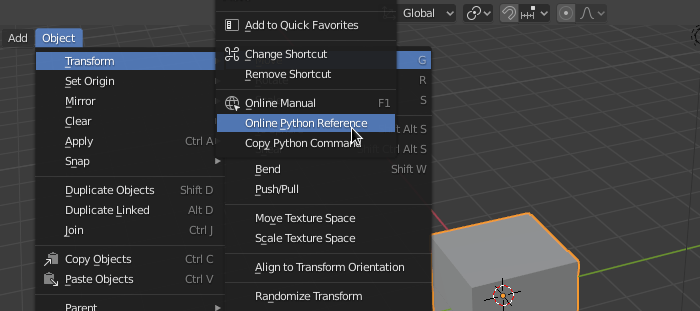
Just beneath the Online Python Reference option is the Copy Python Command. If you click this, it’ll copy that Python command—in this case, bpy.ops.transform.translate()—so that you can paste it into the Console or Text editor.
NOTE: The reference entries can seem rather arcane when you’re starting out, but they’ll make more sense as you grow familiar with Blender’s Python API.
Text Editor Modifications
Before moving onto the next section, there are some useful Text editor features I should introduce.
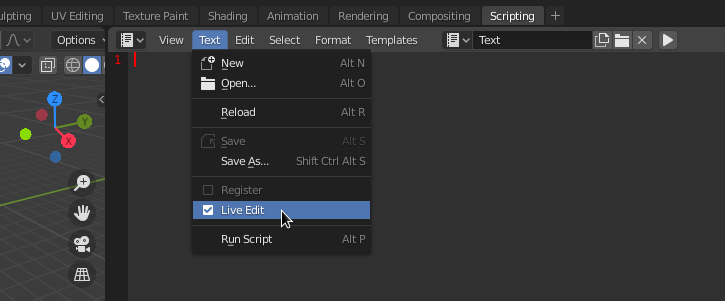
Live Edit
The live edit feature runs Python while you’re editing code; so there’s no need for you to manually run the script (using Alt-P or the ▶ button). I generally avoid using this, but it’s convenient in certain situations.
To activate the live edit feature, create a new script, then check the Live Edit option in the Text menu (Figure 2.9).
You can try this out with a print() function. When you type the p in print(), the terminal displays a Python syntax error. You’ll get errors until you’ve typed in the complete function name and closing parenthesis.
NOTE: If the editor font is too small, you can change the size by holding the
ctrlkey and scrolling the mouse wheel.
Enter a number between the empty parentheses and the terminal prints it. The terminal will print a new line each time you add or change a digit (Figure 2.10).
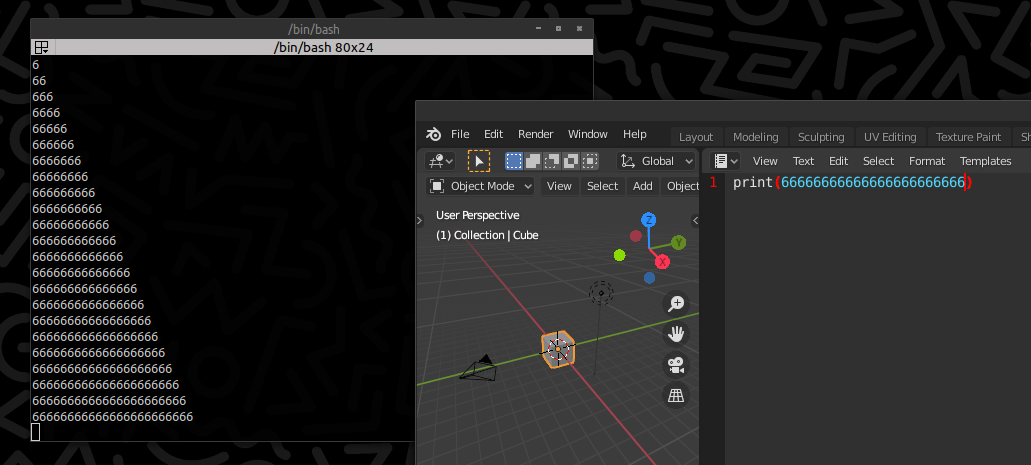
print() functionLive Edit works with any code, not just print() functions. You can enable or disable it at any time.
Section Summary
I’ve reviewed some Blender features to help you develop scripts. You’ll use these different techniques while you work through the lessons.
In the next section, you’ll move onto some Blender scripting basics, manipulating 3D objects using code you write in the Text Editor.
part 3 of 3 »
Complete list of Blender Creative Coding lessons