This series of tutorial posts covers Processing.py, with the purpose of introducing non-programmers to the fundamentals of computer programming in a visual context. If you’re an artist, student, designer, researcher, or just somebody who is keen on learning how to code, Processing is a great place to start.
Complete list of Processing.py lessons
I’d estimate each complete lesson (eg. lesson 1.1 to 1.5) to take around 2–4 hours to complete, of which a large part of that time will be spent on the tasks/challenges. The speed at which you get through the lessons is likely to be influenced by your prior experience in relatable areas. That said, it’s not a race – enjoy the ride and stop for breaks wherever. Hey, if you’re really feeling inspired, feel free to head off-road!
My thanks go to Åke Jonsson for his feedback on these lessons.
Let’s begin.
Intro to Processing
Processing has been around since the early 2000’s and is comprised of a programming language and an editor for writing and compiling code (IDE). The original programming language component is based on Java, but several other variants have been developed. These include a JavaScript (p5.js), Ruby (JRubyArt), and Python (Processing.py) version.
As somebody teaching programming fundamentals to creative students – who will proceed to take courses in web, game, and interactive design & development – combining Processing with Python provides an ideal learning tool. What’s more, Processing costs nothing, is open source; and runs on multiple platforms, including Windows, Mac, and Linux.
You can think of Processing.py as a kind-of extension of the Python programming language, with all sorts of drawing features and an editor rolled-in. Sometimes it may seem that these notes use the terms “Processing” and “Python” interchangeably. I will usually refer to Processing-exclusive features in the context of “Processing”; and standard Python features in relation with the term Python. If this confuses you, think of them as one and the same! At this point, it’s not important that you are able to distinguish Processing from Python, although you’ll come to understand the differences in time.
Setup Processing
Before you can write any code, you’ll need to download Processing. Head over to the Processing download page, and download the relevant version (Windows/Mac/Linux). Note that Processing 3.5.4 is the latest stable release at the time of writing. For the upcoming Processing 4, the process shouldn’t change:
Run the application. Note that the default mode is “Java”. As these tutorials cover the Python variant, you’ll need to switch to Python mode.
Click on the down arrow next to “Java” and select Add Mode… . Then, from the Contribution Manager window that appears, choose Python Mode for Processing 3 (or 4 if applicable). Finally, click Install.
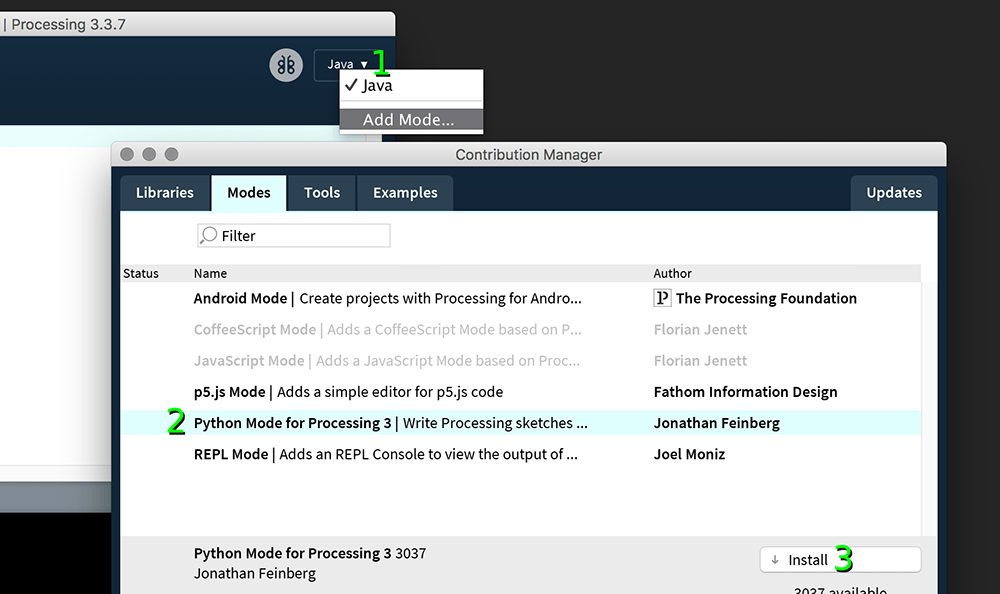
Once this is complete, you can switch to Python mode.

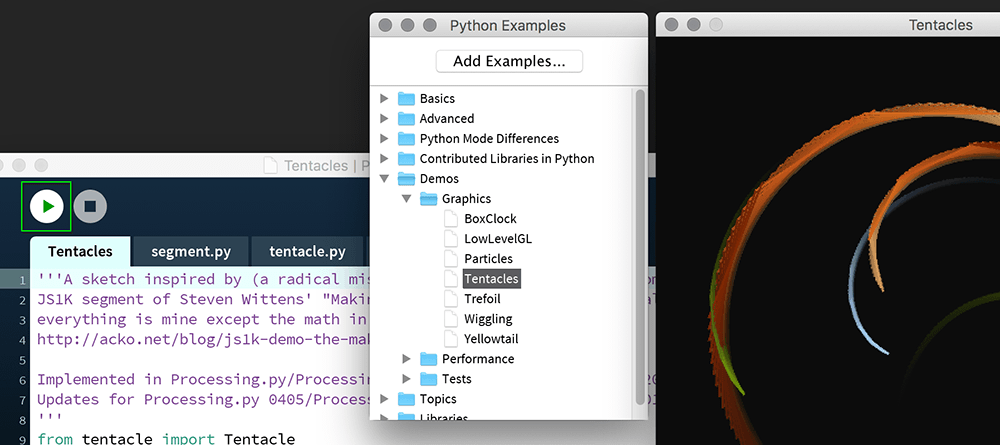
You are now ready to write your first line of code! If you’d like a demonstration of what can be accomplished, perhaps take a look through the examples (File > Examples…) included with Processing.py. If you are ready to begin writing your own code, move onto the next section.
Algorithms
You’ll encounter the term algorithm frequently from here onward. For these tutorials, the definition of an algorithm is: a set of rules a computer or machine follows to achieve a particular goal. As an example, an algorithm for making a cup of instant coffee will read as follows:
- place one heaped teaspoon of instant coffee in a mug;
- fill the kettle with water;
- switch-on the kettle;
- once boiled, add 240 ml boiling water to the mug;
- add one level teaspoon of sugar to the mug;
- stir the contents of the mug.
However, this set of steps would likely be insufficient for programming a coffee-making robot. Should the sizes of the mugs vary, smaller ones would overflow; and any requests for milk or extra sugar would be ignored. Computers cannot make any assumptions and therefore require explicit and unambiguous direction, and this requires communicating in a language the machine understands – like Python. Learning to write code may be the challenge you currently face, but as you grow more fluent, this will shift more towards mastering algorithmic thinking.
Hello World
Processing refers to programs as “sketches”. Given the visual and artistic nature of what you are likely to produce, it’s a fitting term. Create a new sketch by selecting File > New, or using the associated keyboard shortcut (which is listed alongside the menu entry).
Processing Functions
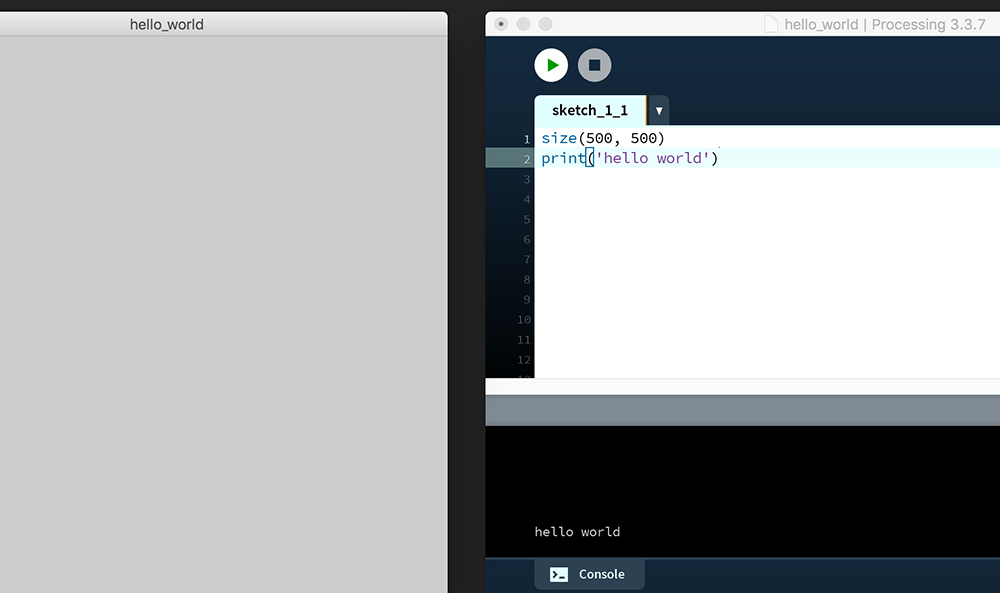
Type in the following lines of code:
size(500, 500)
print('hello world')
Using File > Save as… save the sketch (to wherever it’s you wish to store it) and name it “hello_world”. You’ll notice that each sketch is saved as a new folder – in this case, a folder named “hello_world”. Within this are two files: hello_world.pyde and sketch.properties.
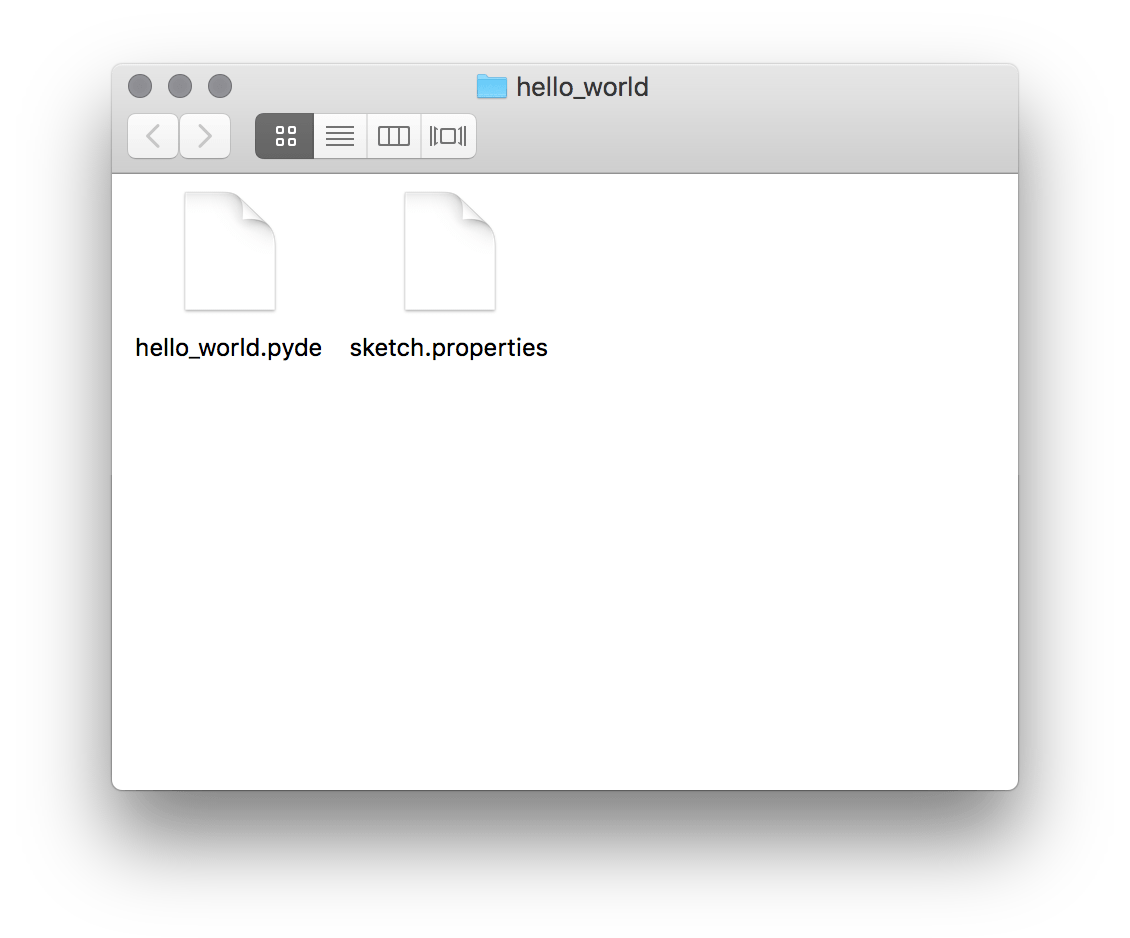
You may also add other assets to your sketch folders, such as images and fonts – but more on that later.
Hit the ▶ button to execute the code. Better yet, use the associated keyboard shortcut: Ctrl+R for Windows and Linux; or ⌘+R for Mac.
You’ve used two Processing functions here – size() and print(). Functions consist of a function name followed by an opening and closing paren (or round bracket, if you prefer). Within these brackets, you supply arguments. The size() function takes two arguments: the first represents the width of your sketch; and the second, the height. In this case, the display window is 500 pixels wide by 500 pixels high. For reference purposes, you could write out the size function with the required arguments named according to the values they accept:
size(width, height)
Throughout these notes, you’ll find functions presented in this manner to explain their operation.
The print() function writes to the Console area – the black rectangle at the bottom of the editor. Print takes a single argument; in this case, the phrase 'hello world'. Because this is text – or, more correctly speaking, string data – it must be wrapped in quotation marks. You may use single- or double-quotes, but be sure to close-off using the same type with which you’ve opened.
What separates Processing.py code from Python code are the functions. The size() function is Processing-specific. In other words, it will not work outside of the Processing environment. The print() function, on the other hand, is a built-in part of the standard Python programming language. It will, therefore, work in any Processing.py or Python application.
Processing Reference
For a complete list of Processing.py functions and the arguments they require, you can refer to the online reference:
Note that the reference also includes many standard Python language structures, keywords, and functions – most of which we’ll cover along with the Processing functions.
Comments
Comments can be used to leave notes to yourself or anybody else editing your code. These come in two types: single- and multi-line. Use a # character for single-line comments, and ''' or """ for multi-line comments. Add some comments to your current sketch to see how they work:
# dimension of the display window in units of pixels
size(500, 500)

print('hello world') # writes hello world to the console area
'''
This is a multi-line comment.
Any code between the opening and closing triple-quotes is ignored.
'''
print('how are you?')
While working through these lessons, add your own comments to remind you of what you’ve learnt. You can also comment out select lines of code, which can prove useful when debugging.
Whitespace
Python, and by extension Processing.py, is whitespace-sensitive. As an example, add a few space characters at the beginning of the size() line; then run your sketch.
# dimension of the display window in units of pixels
    size(500, 500)

...
Because Python relies on indentation to distinguish blocks of code, the indented line breaks the program. Processing displays an error in the Console, as well as highlights the line on which the problem was encountered.
You’ll come to understand more about when and where to use indentation as you progress through these lessons. You may even be familiar with some programming language that uses braces ({ and }) to define blocks, in which case: Python replaces the need for these using indentation. For now, though, be aware that you need to pay careful attention to any space and tab characters that affect the indentation of your code.
Errors
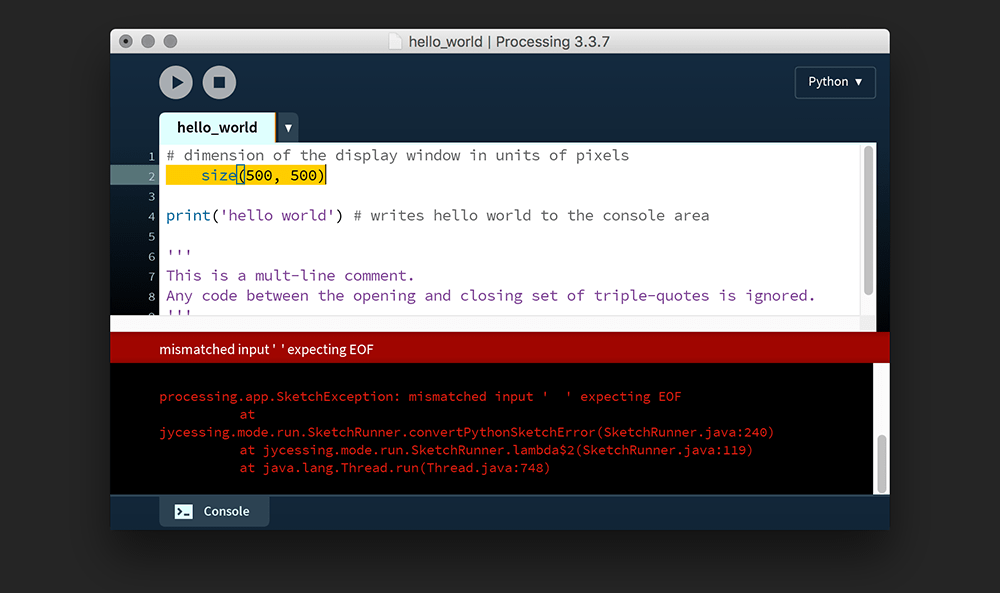
Whitespace errors are not the only type logged in the console. You are likely to miss-out the odd paren, comma, or quote mark, especially when starting out. Remove the closing bracket/paren on your size function:
# dimension of the display window in units of pixels
size(500, 500

...
Now run the code and observe the console output:
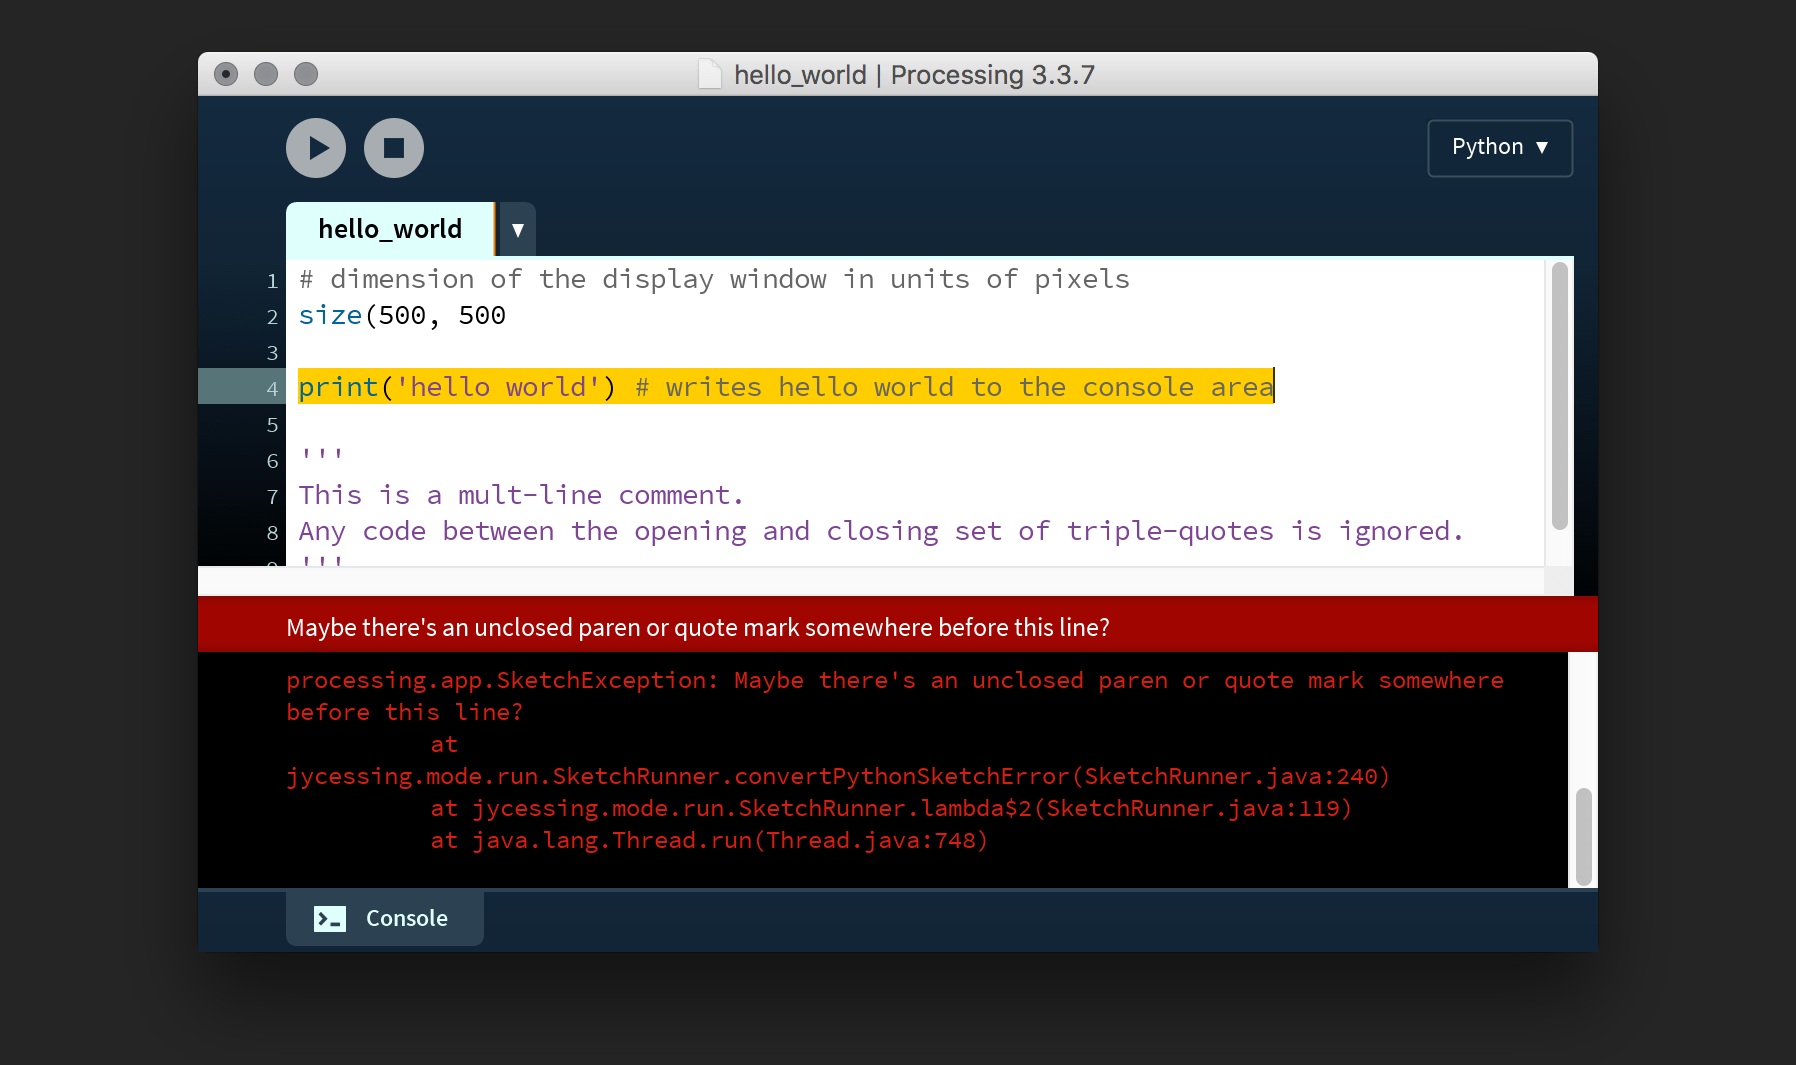
Note the white-on-red suggestion. Pretty smart, huh? To be honest, the console is not always so clear or correct, but it usually provides a clue as to where to start looking for bugs.
1.2: Colour »
Complete list of Processing.py lessons